Second Grade · Getting Started with Scratch Coding

Lab 3: Steer with the Arrow Keys

Add a dog, then use the arrow keys to guide the dog up, down, left and right.

Play it first

Here is the story you will make today.

The story

The dog wants to go out and wander around to see what he can see. He wants you to guide him so he does not get lost!

Play: Guide the dog

This project plays from the Scratch website. Nothing loads from Scratch until you press play.

Click the stage once, then press the arrow keys on your keyboard.

  1. Step 1: Start fresh and add a dog

    Press File, then New. The cat is there, but this story is about a dog. Watch the video. It shows you how to start, how to add the dog, and how to take the cat away in the next step.

    Video coming soonStart a project, add the dog and delete the cat
    1. Press File, then New.
    2. Find the Choose a Sprite button at the bottom right, next to the Sprite list. Move your mouse over it.
    3. Click the magnifying glass.
    4. Look for a dog, or type dog in the search box. Click the dog you like.
    5. Your dog shows up on the stage and in the Sprite list.
  2. Step 2: Say goodbye to the cat

    The cat does not belong in this story. Take it off the stage.

    1. Click the cat in the Sprite list.
    2. Click the little trash can in the top corner of the cat. Now the cat is gone.
    3. Click the dog in the Sprite list so the dog is the one you are working on.

    Scripts go to the sprite you picked. Always click the dog before you build. If you delete the wrong sprite, open the Edit menu and choose Restore Sprite.

  3. Step 3: Go right

    Build this script for the dog. Press the right arrow key on your keyboard.

    Dog goes right

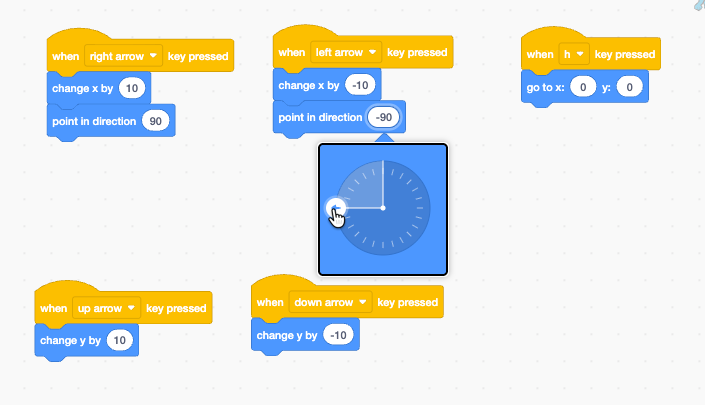
    when right arrow key pressed
    change x by 10

    x is how far left or right. y is how far up or down. Change x moves the sprite sideways.

  4. Step 4: Go left, up and down

    Copy the idea three more times. Change the key and the number.

    Dog goes left

    when left arrow key pressed
    change x by -10

    Dog goes up

    when up arrow key pressed
    change y by 10

    Dog goes down

    when down arrow key pressed
    change y by -10

    A plain number goes one way. A number with a minus sign goes the other way.
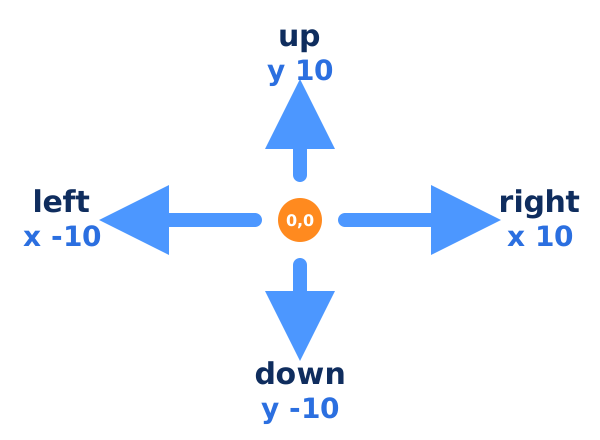
    • An x number goes right. An x number with a minus sign goes left.
    • A y number goes up. A y number with a minus sign goes down.
    A plus-shaped picture with a dot in the middle. Right is x 10, left is x -10, up is y 10, and down is y -10.
    Four ways to move. The dot in the middle is x 0, y 0.
    • Click the key name in the Events block to choose a different key.
    • Right-click a script and choose Duplicate to copy it faster.
  5. Step 5: Make the dog face the way he walks

    Right now the dog slides backward when you press the left arrow. Let us turn him to face where he is going.

    Video coming soonPoint in direction: face left or right

    Dog goes right and faces right

    when right arrow key pressed
    change x by 10
    point in direction 90

    Dog goes left and faces left

    when left arrow key pressed
    change x by -10
    point in direction -90
    1. Click your dog in the Sprite list. Click the word Direction in the sprite info box, then choose the left-and-right arrows. This keeps the dog from turning upside down.
    2. Click Motion. Drag point in direction under the change x block in your right arrow script.
    3. Click the number in the block. A round dial pops up. Drag the white arrow so it points right. The number says 90.
    4. Do the same in your left arrow script. Drag the white arrow so it points left. The number says -90.
    5. Press the left and right arrow keys. The dog turns to face the way he walks!
    Scratch point in direction block with a round dial open. A white arrow on the dial points left, and the block shows -90.
    Click the number in the block, then drag the white arrow to point the way you want the dog to go.

    You do not need to know the numbers. Just drag the arrow in the dial to point the way you want the dog to go. The up and down scripts stay the same.

  6. Step 6: Help the dog wander

    Press each arrow key. Does the dog go the right way? Guide him all around the stage, and do not let him get lost!

    If something does not work, do not worry! Finding and fixing a problem is called debugging. Every coder does it.

  7. Step 7: Press H to go to the middle

    Remember the H key from Lab 2? Add it to your dog. Then you can always send him back to the middle, x 0 and y 0.

    Press H to go to the middle

    when h key pressed
    go to x: 0 y: 0

Check your work

Play the finished project at the top of this page again. Does your dog move the same way?

  1. Is the cat gone, with only the dog on the stage?
  2. Does each arrow key send the dog in the right direction?
  3. Does the dog face left when he goes left, and right when he goes right?
  4. Can you guide the dog to all four corners of the stage?
  5. Does the dog jump to the middle when you press h?

Finished?

Great work! Pick what comes next.

For grown-ups: computational thinking in this lab

Events An event starts a script. Children see that the computer waits for them.

Decomposition The big idea "move in four directions" splits into four tiny scripts.

Pattern recognition The four scripts are nearly the same. Duplicating and changing one thing uses the pattern.

Sprites keep their own scripts Each sprite has its own code. Scripts built for the cat stay with the cat, so the dog needs its own. This idea comes back in the game.

Negative numbers without the math Point in direction uses 90 for right and -90 for left. Scratch's round dial lets children pick a direction by dragging an arrow, so they do not need to understand negative numbers yet. It also matches change x by -10 for moving left. Using point in direction, instead of turn blocks, means the sprite always faces the way it moves.

Debugging Testing each key and fixing it is the testing and debugging practice.

Grown-ups: how did this activity go? Send us feedback

For teachers

Plan about 30 to 40 minutes. Watch the video together, then let children build. The step that adds a dog and removes the cat is new for many children, so check that each child has clicked the dog before building scripts. Check the notes for teachers and parents for account options.

Read the full notes for teachers and parents